
AI Relight Feature in Filmora
Transform dull, poorly lit footage into cinematic brilliance with the AI Relight feature of Wondershare Filmora. Instantly adjust brightness, shadows, highlights, and subject lighting with intelligent AI-powered video lighting controls without using any expensive studio gear or advanced editing skills. Whether you’re fixing backlit videos, enhancing portraits, or creating dramatic moods, Filmora AI Relight delivers professional-quality lighting in just a few clicks. Save time, boost visual impact, and make every frame look polished, vibrant, and ready to impress your audience. Create stunning, scroll-stopping videos effortlessly with the powerful AI Relight technology in Wondershare Filmora.
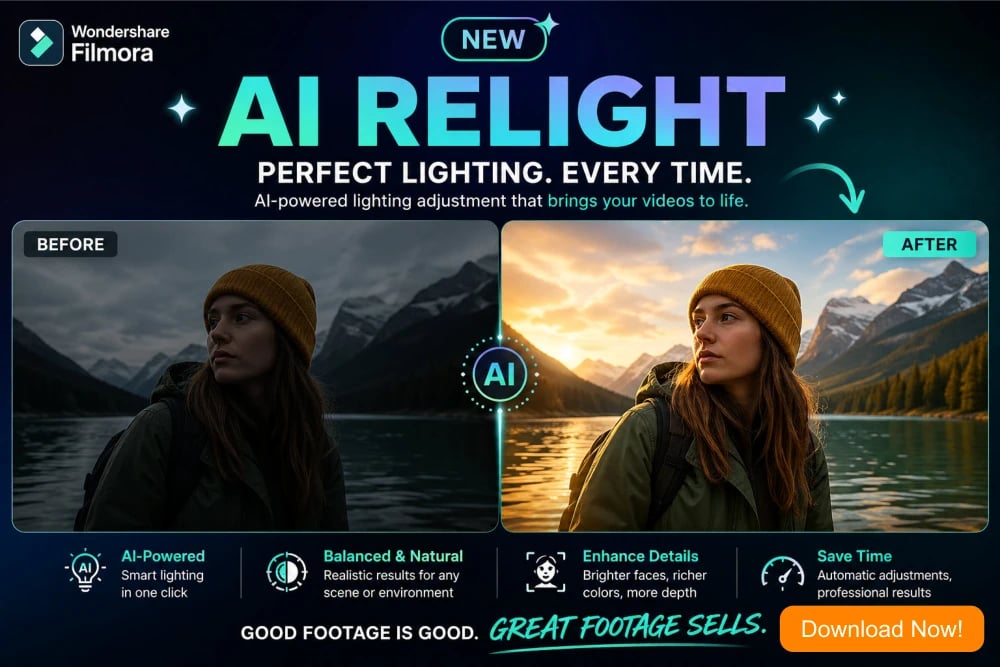


Filmora AI Relight - Transform Dull Videos into Brilliant Visuals
If you’ve ever recorded a video that looked perfect in real life but turned out dark, flat, and lifeless on screen, you’re not alone. Poor lighting is one of the most common issues that people face, especially when shooting indoors or at night. Fortunately, modern tools like Wondershare Filmora with its AI Relight feature have made it incredibly easy to fix these video lighting problems without investing in expensive video lighting equipment. The standout feature of AI Relight is that it intelligently enhances lighting in your footage with just a few clicks. Imagine recording a birthday video in a dim room, where faces look shadowy, and details are lost. With Filmora AI Relight, you can brighten faces, balance shadows, and create a natural glow that feels professionally lit. This guide will walk you step by step through improving dull video lighting using Filmora’s AI Relight, even if you’ve never edited a video before.
Understanding Why Video Lighting Looks Dark and Dull
Before jumping into the solution, it’s important to understand the problem. Videos appear dark due to insufficient light, poor camera exposure, or uneven lighting conditions. For example, if you record a vlog near a window, but the background is brighter than your face, the camera often underexposes your subject, leaving you looking dim. Similarly, indoor recordings with a single overhead bulb create harsh shadows and dull tones. Traditionally, fixing this required studio lights, reflectors, or reshooting the footage. But with AI-powered tools like Filmora AI Relight, you can now correct these issues after recording. AI Relight analyzes your footage, detects subjects, and adjusts lighting dynamically. This means you don’t just increase brightness, you enhance lighting in a smart, natural way. Understanding this difference is key because it explains why Filmora’s AI Relight produces results that look realistic instead of overly edited or washed out.
Getting Started with Filmora AI Relight
To begin, download and install Wondershare Filmora on your computer. The interface is beginner-friendly, making it ideal for those who have never edited videos before. Once installed, open the software and create a new project. Import your dull or dark video by dragging it into the media library. For example, if you shot a cooking tutorial in low kitchen lighting, this is where you bring that clip into Filmora. Drag the clip onto the timeline to start editing. Filmora’s clean layout ensures you won’t feel overwhelmed because everything from effects to color tools is clearly labeled. This simplicity is part of its appeal as a powerful yet accessible video editor. At this stage, you’re just preparing your footage. The real transformation begins when you access the AI tools in Filmora, especially the AI Relight feature designed specifically to fix lighting issues.
Locating the AI Relight Feature in Filmora
Once your clip is on the timeline, click on it to open the Filmora editing panel. Navigate to the AI Tools section, where you’ll find AI Relight. This feature is specifically designed to enhance lighting without requiring manual adjustments like exposure or contrast sliders. For instance, if you recorded a travel vlog at sunset and your face appears too dark compared to the sky, AI Relight can fix that imbalance instantly. Simply enable the feature, and Filmora will begin analyzing your video. It detects faces, objects, and lighting conditions to apply targeted improvements. Unlike traditional editing methods, you don’t need technical knowledge about lighting setups. Everything is automated yet customizable. This makes it perfect for beginners who want professional results quickly. Think of it as having your own virtual lighting crew working behind the scenes to enhance your footage, effortlessly.
How Filmora AI Relight Works Behind the Scenes
AI Relight isn’t just a brightness adjustment tool; it uses artificial intelligence to understand your video. It identifies the subject, separates it from the background, and applies lighting enhancements as appropriate. For example, in an interview clip shot indoors, AI Relight can brighten the speaker’s face while keeping the background natural. This prevents the “overexposed” look that often happens with manual edits. The AI Relight feature in Filmora also adjusts shadows, highlights, and color tones to create a balanced image. Imagine filming a product review with uneven lighting, where one side of the product looks darker than the other. AI Relight can correct this by digitally redistributing light. This advanced processing is what makes Filmora stand out. Instead of requiring expensive softboxes or ring lights, the software recreates professional lighting effects using AI. Understanding this process helps you appreciate the power of the AI Relight tool and use it more effectively.
Applying Filmora AI Relight to Your Video
To apply AI Relight, simply toggle the feature on after selecting your clip. Filmora will automatically enhance the lighting, but you can fine-tune the effect using sliders. For example, if you’re editing a nighttime vlog, you might increase brightness slightly while maintaining natural shadows. The key is subtlety; avoid pushing the settings too far, as this can make the video look unnatural. A good approach is to compare before-and-after views within Wondershare Filmora. You will notice how details become clearer, colors more vibrant, and faces more visible. For instance, a dimly lit birthday party video can suddenly feel lively and well-lit. This step is where your footage begins to transform. The ease of applying AI Relight in Filmora video editor makes it accessible to anyone, even those with zero video editing experience. It’s a powerful reminder that you don’t need expensive gear to achieve professional-looking results.
Enhancing Video Lighting of Faces and Subjects Specifically
One of the most impressive aspects of the AI Relight feature in Filmora is its ability to focus on faces and key subjects. In many videos, the subject is the most important element, and poor lighting can ruin the viewer’s experience. For example, in a YouTube talking-head video, viewers need to clearly see your expressions. AI Relight detects faces and applies targeted lighting adjustments, ensuring they stand out. This is especially useful for vloggers, educators, and content creators. Imagine recording a tutorial in a dim room where your face might appear shadowy, making it harder for viewers to connect with you. With AI Relight, your face becomes brighter and more defined without affecting the entire frame. This selective enhancement mimics professional lighting setups, where lights are positioned to highlight the subject. Filmora achieves this digitally, saving you time, money, and effort while delivering impressive results.
Balancing Background and Foreground Video Lighting
Another challenge in video editing is balancing the video lighting between the subject and the background. Often, beginners end up with a bright background and a dark subject, or vice versa. AI Relight solves this by adjusting both elements independently. For example, if you filmed a video in front of a window, the background might be overexposed while your face is underexposed. Filmora AI Relight can reduce the brightness of the background while enhancing the subject. This creates a balanced, professional look. Similarly, in indoor recordings, AI Relight can brighten the entire scene while maintaining depth and contrast. This balance is crucial for storytelling, as it ensures viewers focus on the right elements. Filmora’s AI Relight makes this process effortless, eliminating the need for complex manual adjustments. The result is a visually appealing video that feels polished and engaging.
Fine-Tuning Video Lighting for Natural Results
While AI Relight feature of Filmora does most of the work automatically, fine-tuning it is essential for achieving the best results. After applying the effect, adjust the intensity to match your desired look. For example, if you’re editing a cinematic short film, you might prefer softer video lighting with subtle shadows. On the other hand, a vlog might benefit from brighter, more vibrant video lighting. Filmora's AI Relight feature allows you to easily customize these settings. Always aim for a natural appearance because excessive video editing can make your video look artificial. A helpful tip is to step away for a moment and revisit your edit with fresh eyes. This helps you spot any inconsistencies. For instance, if skin tones look too bright, reduce the intensity slightly. Fine-tuning ensures your video maintains authenticity while benefiting from enhanced lighting. It’s the final step that turns a good edit into a great one.
Combining AI Relight with Other Tools
To maximize results, combine AI Relight with other features in Wondershare Filmora. For example, use color correction tools to adjust saturation and contrast after improving lighting. If your video still looks slightly dull, increasing vibrancy can make colors pop. Another useful feature is white balance adjustment, which corrects color temperature. Imagine a video shot under yellow indoor lighting. After using AI Relight in Filmora, you can adjust white balance to achieve a more natural tone. You can also add filters for a creative touch. Combining these tools allows you to fully transform your footage to the next level. The key is to use each feature in moderation, ensuring the final result looks cohesive. Filmora’s all-in-one approach makes it easy to experiment and refine your edits, giving you complete creative control without complexity.
Real-Life Example: Fixing Video Lighting of a Dark Vlog
Let’s consider a practical example. Suppose you recorded a travel vlog inside a dim café. The footage looks grainy, your face is barely visible, and the overall mood feels dull. After importing the clip into Filmora, you apply AI Relight. Instantly, your face becomes brighter, the background gains clarity, and the colors look more appealing. You then fine-tune the intensity to maintain a cozy atmosphere. Next, you adjust contrast slightly to add depth. The result is a video lighting that feels warm and inviting rather than dark and unappealing. This transformation highlights the power of AI Relight. Without reshooting or using additional lighting equipment, you’ve turned unusable footage into engaging content. This is particularly valuable for content creators who often work in unpredictable lighting conditions.
Real-Life Example: Enhancing Indoor Video Lighting
Another example involves recording an educational tutorial at home. Many beginners rely on basic room lighting, which often creates shadows and uneven illumination. After applying AI Relight in Filmora, the lighting becomes balanced and professional. Your face is clearly visible, and the background no longer distracts viewers. You can then add text overlays or graphics to enhance the presentation. This improved clarity makes your tutorial more engaging and easier to follow. Viewers are more likely to stay and watch when the video looks polished. This demonstrates how AI Relight not only improves visuals but also enhances the overall effectiveness of your content. It’s a simple yet powerful way to elevate your videos without investing in expensive gear.
Avoiding Common Mistakes
While AI Relight is powerful, there are a few common mistakes to avoid. One is overusing the effect, which can lead to unnatural lighting. For example, increasing brightness too much can wash out details and make skin tones look unrealistic. Another mistake is ignoring the original mood of the video. If you’re editing a nighttime scene, you don’t want it to look like daytime. Always aim to enhance, not completely change, the video lighting. Additionally, avoid skipping fine-tuning, because although automatic results are good, small adjustments make a big difference. By being mindful of these pitfalls, you can achieve professional-quality results consistently. Filmora makes it easy to correct mistakes, so don’t hesitate to experiment and refine your edits.
Saving and Exporting Your Enhanced Video
Once you’re satisfied with your edits, it’s time to export your video. In Wondershare Filmora, click on the export button and choose your desired format and resolution. For example, if you are uploading to YouTube, select a high-resolution format like 1080p or 4K. Filmora provides presets for AI Relight on different platforms, making the process easy. Before exporting, preview your video to ensure everything looks perfect. Pay attention to lighting consistency throughout the clip. Once exported, your video is ready to share. The transformation from dull to vibrant video lighting will appeal to your audience. This final step completes the process, turning your improved lighting into a polished, shareable video.
Why Filmora is Perfect for Beginners
One of the biggest advantages of Wondershare Filmora is its accessibility. Unlike complex editing software, Filmora is designed with beginners in mind. Features like AI Relight simplify tasks that would otherwise require advanced skills. For example, instead of learning about lighting setups, you can achieve similar results with a single click. This makes Filmora an excellent choice for students, vloggers, and small business owners. Its intuitive interface and powerful tools strike the perfect balance between simplicity and functionality. This combination is what makes Filmora a great choice among creators worldwide.
The Cost Advantage of Filmora AI Relight
Traditional lighting equipment can be expensive and cumbersome. Softboxes, ring lights, and reflectors require both investment and setup time. With AI Relight, you can cut these costs completely. For example, instead of spending hundreds of dollars on lighting gear, you can achieve similar results using Filmora AI Relight. This makes high-quality video production accessible to everyone. Whether you’re creating content for social media or professional projects, AI Relight provides a cost-effective solution. It’s a game-changer for beginners who want to produce polished videos without breaking the bank.
Final Words: Elevate Your Video Lighting Effortlessly
Improving video lighting no longer requires technical expertise or expensive equipment. With Wondershare Filmora and its AI Relight feature, anyone can transform dull, dark clips into vibrant, professional-looking videos. From understanding lighting issues to applying AI enhancements and fine-tuning results, the process is simple yet powerful. Real-life examples show how effective this tool can be in various scenarios. By following this guide, you can confidently enhance your videos and create content that stands out. Filmora empowers you to focus on creativity while handling the technical aspects seamlessly. Wondershare Filmora is not just a video editor. It is your partner in bringing your vision to life.